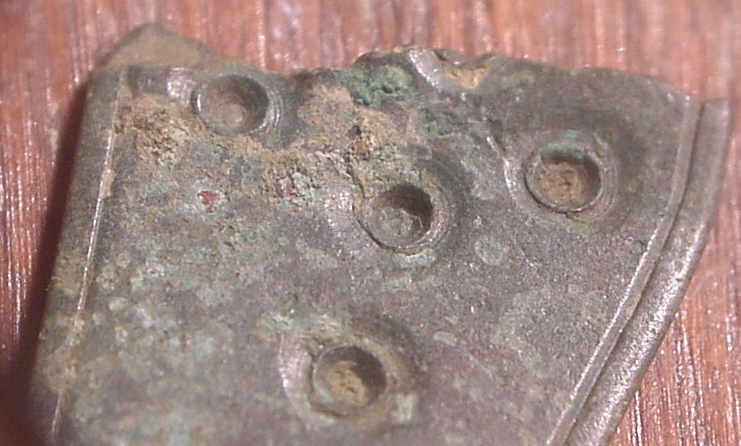
Romano-British strapend
The simplicity of this little Romano-British strapend belies a complex construction technique. The piece is very thin, less than 1mm, and does not appear cast. Now broken, the top was originally split to hold a strap. It is 35mm long.
Split
As you can just make out in the picture, the split seems to run into the body and end. There is no trace of any solder line or part indicating two flat pieces were joined together leaving a split top. Rather, it appears that a larger piece of stock was sawn or split partway, then forged thin, leaving a solid body and split leaves for attachment to the strap.
Ring and Dot

Looking closely at the ring and dot decoration shows that the outer ring is a hemispherical depression and the inner dot is more a "crater" with raised edges. One of the dots edges mushroomed out to some extent. Both the outer ring and dot show regular annular rings indicative of a circular cutting motion. It would appear then that these were made by a rotating tool instead of a stamp. Furthermore, the tool seems to rotate completely around in a single direction, not a twisting left-right motion because the rings/scrape marks appear unbroken. It is possible they were done with a single tool, however I suspect two bits where used--one for the large, hemisphere ring, and a smaller one for the dot. This would account for the crater-like ridge (as metal is pushed up around the dot due to a dull bit) and the mushrooming of the upper right dot edges. Certainly some experimenting is in order to test this out.
Next, we turn our attention to the sunken boarder on the front and back. You will immediately notice 3 things: it is comparitivly wide with a smooth, flat bottom, it is very evenly spaced from the outer edge, and it runs off the end of the strapend tip on the back. I would conclude from this that it is not done freehand with a graver, or it would be less regular and have a V-shaped trench. It was not chased with a blunt chisel or it would have uneven dimples at the bottom of the trench. Instead I would suggest a scraping tool that could be dragged along the edge, with a fixed stop on one side, keeping it an exact distance from the edge. This would produce a very even cut very quickly.
Tip
Finally we turn to the tip decoration. It appears that these horizontal ridges were simply done with the cross pein of a small hammer or possibly a blunt chisel. I would lean towards a hammer because it would be expedient, and some of the blows were not completely flat (they are deeper on the right side), an anomoly which manafests itself more with a hammer than a chisel.
Overall a very interesting piece. I will certainly try some of these techniques out in the near future.